 |
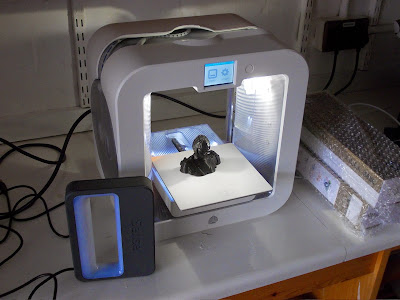
| Sense 3D Scanner and Cube 3D Printer |
We bought a Sense 3D (made by Cubify) scanner last year at the same time as the 3D printers (also made by Cubify), as it seemed like a good idea to be able to scan objects and them 3D print them. But how good is the scanner, and is it easy to use? That's what we aimed to find out ...
We first tested out the 3D scanner to see how well it performed and how easy it was to use. The sense scanner is handheld and designed so that it is capable of scanning small medium and large objects (such as a car, if you were so inclined). The idea is that you take the scanner in your hand and move around the object carefully scanning the entire object, and then the supplied software will cleverly stitch it all together. In theory. However the scanner is not cordless! Not cordless?! In practice this means that you have to hold your laptop and the scanner and move around the subject, else have a very long USB lead. Even with a reasonably long USB lead, we ended up getting the lead wrapped around the subject (Kate in this instance) making scanning a bit cumbersome to say the least. Come on Cubify, this device should be wireless; it needs to be wireless. Perhaps the next version will be, who knows.
So, we tried scanning a cup on a table as a test scan. The first attempt failed, as we ended up with three cups. The room lighting, it has to be said, does seem to make a difference to the scan. So keep the sunlight away. The next try was by placing the cup onto a box so that it is not flat on the table. This worked a bit better, but perhaps because it was just a bit easier to get around the object. The scan was still somewhat poor, with lots of holes in the final mesh. So we thought that a bigger object might be easier, so Kate volunteered to be the subject. Positioned in a chair, I positioned the scanner about 450cm from Kate and walked very slowly around her keeping the scanner pointed directly at her, as shown in the image preview given by the software. The software shows the subject being scanned, and also shows a circle on the screen to help guide your positioning. It's a bit hard to explain, without some images (which I'll take next time) and is quite difficult to get the position correct as the image moves in the opposite direction to the physical device.
After about 10 minutes of walking around Kate at a snails pace, we ended up with a mesh (I'l add the image of this next time) which didn't look too bad, aside form a few weird artefacts that were produced by the software when Kate moved the cable out of the way to stop it getting tangled (hence the need for WIRELESS!!).
The software for creating the final mesh is not exactly intuitive, and is fiddly and awkward to use. But we ended up with a reasonable model, and so imported it next to the Cubify software that came with the Cube. That is also rather awkward to use (Cubify, you seriously need to employ an HCI person(s), and sort out your crappy interfaces) but we eventually managed to convert it to the correct format and export for the Cube printer:
The image above shows the finished model, which took about 5 hours. I have removed the squiggly bits of filament that covered it. I assume they were remnants form the print process, and not errors. I was quite impressed by the quality of the print (excellent overall) and the printers ability to print overhangs without supports. Here's one more image:
 |
| A faithful rendition of kate a la Sense scanner |
 |
| Close up of the Kate model |
Verdict: Sense scanner needs more road testing, and shows promise. The wire is a serious shortcoming, and I am trying to figure out a way of making it wireless - perhaps via some bluetooth hack? The Cube printer is a very nice little machine and I'm really impressed with its performance. Yesterday I printed a bracket (see worm gear post) for a student in the Art Dept for some work he created, and the Cube did a splendid job.


No comments:
Post a Comment